Friday, June 16, 2017

New Youtube Channel, Bullet Journaling

Hey, everyone!  You probably thought I was dead.  I'm not.  It's great.

The past couple years of teaching have been a real rollercoaster for me.  I was on a cart, I had major back surgery, I had a fantastic TA while I recovered, and I finally got my classroom back last year.  I will make a post about mobile art programs sometime in the future.

But for now, let's talk about something that has helped me deal:  Bullet Journaling.  If you're unfamiliar with the system of Bullet Journaling, invented by Ryder Carroll, here's his original video on the topic.

Now, as a human with anxiety and ADD, I had always struggled with stress and organization.  But in my experience directing youth theatre, I found that organization is essential for dealing with stress.  I found that since theatre was something I was passionate about, I prioritized it in a way that made working on all aspects of it feel good to me.  I enjoyed the very act of creating calendars and rehearsal schedules.  But I found using online resources designed for this to be tedious.  For me, an analog system turned out to be best.

When I began running Dungeons & Dragons games for my friends, I was looking for ways to index notebooks, and I came across this system.  I implemented it for my notebook, and I found that planning for that became exponentially more enjoyable, as well as productive.

And so in January 2017, I made a New Year's Resolution designed to level up my life.  I wanted to do adulting for real.  I was so tired of missing deadlines and having long stretches of time when I was working on too many things at once, only to never finish any of it!

As I set up my journaling system, I was intimidated by the beautiful folks like Kara from Boho Berry, who showed me what a true work of art these journals can be.  But I folded in my knowledge from art school:  a sketchbook is for you.  You don't have to show anyone.  It's utilitarian.  I mean I wanted my notebook to be a joy to look at, but I also wanted to feel like I could actually use it without fear of ruining my pages if I made a mistake.  Here's the fabulous Kara's video for some inspiration:


So what you'll see below is a walkthrough of my almost complete Bullet Journal for the first half of 2017.  Incorporating my lesson goals into each week made my entire school year flow so much more smoothly.  I was able to see when I had free time to accomplish certain tasks, but I also grew to know how much time I could expect to take doing certain things, and plan accordingly.


Lastly, and probably most importantly, this has allowed me to control my ADD and anxiety by keeping me accountable for tasks, and helping me to feel productive every time I check something off.  I rarely struggle with the anxious feeling that, "I should be doing something right now...I am wasting time...but what do I want to do?"

And I found that having this notebook with me wherever I went was a huge comfort to me.  I really love when someone asks me if I'm free on a certain date and I can open it up and check what I'm doing months in advance.  I suppose people who like Google Calendar and the like can do the same thing...but they can't glue in ticket stubs, or the sticker they found on the sidewalk while they were out for a jog, or create custom headers in whatever hand lettered font they want.  Only us analog planner people can do that.  :)

Friday, September 25, 2015

Hey I'm Back! And Obsessing over the Mayans...

Greetings!

After a kinda long and crazy year last year (there was surgery involved) I am back to being my spunky self and the first finished artwork of this school year is going up!

This year I am particularly pumped about a Mayan inspired project I've been doing with Third Grade.  As you might know, I do a global continent theme with the kids, and Third Graders study Mexico, Central and South America.  This summer, during a teacher workshop, we had lunch at Chipotle, and I saw their awesome Mayan glyphs in the restaurant.  I thought, "I am in love with these, and I bet the kids would be, too!"  So here's what I did:

First we had a whole class dedicated to talking about and exploring the culture of the Ancient Mayans.  I showed this video: https://www.youtube.com/watch?v=og0cY1gGWG4

And we talked about Mayan numbers, and the calendar, and so forth.  It was so fascinating to me and the kids that time went by super fast, and we had just enough time at the end of class for them to write Mayan numbers in their sketchbooks, and practice drawing a few simple glyphs for common Mayan words:
This one means "sun."  Obviously the sun played a huge role in Mayan beliefs and culture.  Their calendars are amazing!  And no, they weren't wrong about the world "ending" on December 21, 2012.  They didn't predict that at all; just the end of a very long cycle and the beginning of a new one.  :)

This one means "maize."  The Mayan Creation Story is fascinating and explains why maize was so important to the Mayans.  Check this video out.  (May be a little gross for littles) https://www.youtube.com/watch?v=Jb5GKmEcJcw

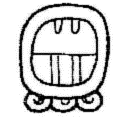
And this glyph means "moon."  Notice the three dots in the middle?  I think their arrangement may have something to do with Orion's belt and the Orion Nebula, which was also possibly very important to the Mayans.

This was one of those lessons that prompted the kids to investigate on their own.  They checked out library books, and did internet searches to learn more, just because they wanted to!  They asked me questions as we passed each other in the hall.  They came up to me before and after school.  This was a hugely engaging topic!

So then the time came for us to create their glyphs.  I decided to use the Mayan syllabary chart to convert their names into syllabic symbols.  (Sort of like Japanese I guess)

This Pdf was a fantastic resource for me, and I read it, and was basically able to do the project from there.  http://www.famsi.org/research/pitts/MayaGlyphsBook1Sect1.pdf

We practiced breaking their names into syllables and writing their respective syllabic symbols.  That took another entire class.

The following class, I demonstrated how to combine their symbols into one glyph.  They then cut themselves a small piece of recycled cardboard, about 3x3 inches.  I didn't bother asking them to make perfect squares, and this turned out to make them look WAY better as a result.  I love the way they look displayed in a clump.

Anyhow, after cutting their cardboard, they traced the shape of it in their sketchbooks.  Using that shape, they drew their glyph in pencil, then cut out the sketch, which was then the exact size of their cardboard.

I cut a piece of gold tooling foil and wrapped the edges of it around their cardboard.  Then, they taped their paper pattern to the foil and traced it onto the gold foil.  The resulting impressions were pretty darn cool looking, but I wanted to make them look "ancient."

So the next class, i had them use a tiny tiny bit of black block printing ink (this was what I had on hand.  It's probably easier to use india ink if you have that.) and stippled it onto their foil just in the areas where they had indented lines.  Next, and this may sound weird but it worked GREAT, I gave them a blob of Germ-x squirted right onto their project.  Using their fingers, they smeared the ink into the grooves they'd drawn, then wiped away the excess with paper towels.  This was messy, but awesome.  :)  Some of them wanted to polish theirs a bit more, so we used Clorox wipes to do that.  Turns out the Clorox wipes removed a bit of the gold color on the foil too, and that made them look even more interesting in my opinion!  

I had them stick magnets to the back of the project before we inked them, but this is completely optional.  My intention was to display them by sticking them to this metal railing at my school, but they didn't stay very well, and I ended up duct-taping them to the wall instead.  Here's my finished example:


And here's how they looked on the railing:

And now clumped on the wall.  I used a twisted long piece of duct tape to stick them on and they have stayed up very well so far.  I like this look better, but if you've got a good spot to stick these with the magnets, that might look fabulous, too.  


Saturday, August 9, 2014

Happy August, Everybody!

School's already started back?  WHAAAT!?  Seems like it's earlier every year.  Anyway, here's a little update on me.  

Our school is pretty severely overcrowded at this point, and I'm still in a mobile Art situation.  At the end of the year last year, I was asked if I would prefer to move to the former concession stand near the gym and the music room, and I jumped at the chance.  My previous office was small and had carpet.  This one is twice the size, has linoleum flooring, lots of countertops and cabinets, and best of all, a sink!  So it's much more conducive to arty-ness, even though it's still not the same as having an actual classroom.  This location is pretty ideal for me, being near the gym and the stage for theatre things, and near the music room for collaborating with my Fine Arts buddies.


There are moments when I still feel overwhelmed, but I do feel like I'm better equipped this year to make the program work.  And yes, that is the TARDIS on my office door.  At first, I did that for me, just to add a little personality to the space, but then I decided to make it relevant and cuter by adding "Imagination makes you bigger on the inside," above the door.  Already had some compliments on that!


This year we are on an 8 day color rotation.  And since the specials teachers almost all have an additional part time teacher, that makes the planning piece very complicated.  It's going to be pretty near impossible to coordinate on a lesson that keeps pace and is consistent across a grade level.  So my co-teacher and I have decided to have her teach her own self contained lessons, focusing primarily on art criticism, since that's what I tend to leave out due to time constraints.  I will let you all know how that turns out!

But for now, HAPPY SCHOOL YEAR!


Tuesday, April 15, 2014

The Spring Play

This is the time of year when my students start bringing me fun sized Snickers bars.  It's a  bit of an inside joke, actually.

I am the sponsor for my school's Drama Club (which we change the name of just about every year).  And it's almost time for our Spring performance.  We already have one show under our belt as a group:  the Vaudeville Variety Show we put on in November.  It was super cute.  We had a ventriloquist, and a dancing gorilla, and George Burns, and Abbot & Costello.  It was a way to sing and dance a little, get some stage experience and teach a bit of history at the same time.  Did I mention I teach at an ELEMENTARY SCHOOL?  Yep.  I'm pretty sure I'm the only Elementary Art teacher in the known world who is brave (read: crazy) enough to take on directing a group of 42 aspiring actors in 3rd thru 5th grade on top of teaching full time.  But it's something I've always done since I started teaching.  (Guys...I'm so sleep deprived right now that the first time I typed that, I wrote "teachering.")  In fact, I think it's what helped me get hired in the first place.  In my interview I asked if the school had a program like this, and mentioned that I would love to create one and help the music teacher with her shows, etc.  So after growing up as a theatre kid, here I am instructing young minds on how to project their voices whist wearing itchy, homemade costumes and sweating under our stage lights.  

Anyway, back to the Snickers.  I explained to my theatre kids that when we get close to performance time, Miss Teacher morphs into a fire breathing dragon who thinks you're about to steal her gold.  She is tired and cranky, and even though she still loves you, she isn't herself.  She might yell at you for making a minor mistake, or maybe for a huge mistake, but she probably is just HANGRY.  She just needs a Snickers.  Thus, these adorable and hilarious kids have started investing in some  Snickers Insurance.  On Valentine's Day, one student brought me the biggest Snickers bar I have ever seen.  She said, "Just in case you need it this afternoon when we're blocking that crazy scene."
 
Show is in 10 days.  Eep!

Monday, March 31, 2014

Black Glue (tested and improved)

Most of the time when I use something from Pinterest, I test it first.  But as things are now, being a mobile teacher, I don't have much time to test things before I just have to throw them into my lesson.

Thus the black glue mess.

I was trying to do a Kandinsky-inspired lesson with the kinders.  I coordinated with the music teacher and we did a joint lesson about Jazz music and how that relates to Rhythm in art and the artist Kandinsky.  Then I had the kiddos draw with crayons to re-create the feeling of the jazz music we were listening to, keeping them focused on making lines and shapes; abstract, not representational.


Then the plan was to edit their crayon drawings, and pick what we liked the best, then recreate that on a new piece of drawing paper using the black glue you see all over pinterest, then color in between the dried glue with chalk pastels.

"Oh, it's so easy!  Just mix some black tempera or acrylic with your white glue and away you go!"

NOPE.

Wasn't that easy for me.  First of all, I had to find the right kind of glue.  The Elmer's worked fine, but the off brand melted the black paint and wouldn't mix at all, nor would the crayola glue.  (It was too thick.)

So once I had a billion little bottles mixed up, I gave them to the kids and woops!  "MINE WON'T SQUEEZE OUT!"  "MINE'S COMING OUT GRAY!"  "MINE'S BROKEN!"

Don't you love it?  My glue is broken.  Lol.

After dealing with all of that, I then realized I would have to refill the bottles for the next couple of classes, because they got used up pretty quickly.  And refilling the bottles with glue AND paint and mixing them before the kids had to use them?  Nope.  Didn't happen.  There just wasn't time.

So here's what I did:


I made use of an almost empty bottle of black tempera paint; the one that still has paint in it, but not enough to be pumped out by the gallon paint pumper, and I poured a bunch of bottles of Elmer's into it.  Then I closed the lid tightly, and rolled it up and down the hallway, and shook it up.  It mixed up great!  That was WAAAY easier than mixing 30 individual bottles!  Now I can refill the black glue bottles from my big one, and I know the mixture will be the same consistency with all of the bottles!

I did this in the hallway, too, by the way.  Lol.

Friday, March 28, 2014

Homeschoolers Welcome!

It's come to my attention that a fair few of my followers are homeschoolers (or just regular parents) looking for arty project ideas to try at home.  How awesome is that!?  Way to go, you, for nurturing your child's creativity at home!  If I had a Super Parent badge, you'd have earned it!

Of course my blog isn't really designed specifically for you guys, but I am glad to have you here!  My main intention is to share lesson and process ideas with other teachers who are working with large groups of kids.  I just share my experiences, and the choices I have to make given my specific situation, and what's available to me at the time.  So just because I didn't think to use something that seems like it would work better for you, don't be scared!  In fact, I'd love it if you would share that idea with me!  Comments make me feel all fuzzy inside!