Showing posts with label 3rd grade. Show all posts

Friday, September 25, 2015

Hey I'm Back! And Obsessing over the Mayans...

Greetings!

After a kinda long and crazy year last year (there was surgery involved) I am back to being my spunky self and the first finished artwork of this school year is going up!

This year I am particularly pumped about a Mayan inspired project I've been doing with Third Grade.  As you might know, I do a global continent theme with the kids, and Third Graders study Mexico, Central and South America.  This summer, during a teacher workshop, we had lunch at Chipotle, and I saw their awesome Mayan glyphs in the restaurant.  I thought, "I am in love with these, and I bet the kids would be, too!"  So here's what I did:

First we had a whole class dedicated to talking about and exploring the culture of the Ancient Mayans.  I showed this video: https://www.youtube.com/watch?v=og0cY1gGWG4

And we talked about Mayan numbers, and the calendar, and so forth.  It was so fascinating to me and the kids that time went by super fast, and we had just enough time at the end of class for them to write Mayan numbers in their sketchbooks, and practice drawing a few simple glyphs for common Mayan words:
This one means "sun."  Obviously the sun played a huge role in Mayan beliefs and culture.  Their calendars are amazing!  And no, they weren't wrong about the world "ending" on December 21, 2012.  They didn't predict that at all; just the end of a very long cycle and the beginning of a new one.  :)
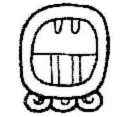
This one means "maize."  The Mayan Creation Story is fascinating and explains why maize was so important to the Mayans.  Check this video out.  (May be a little gross for littles) https://www.youtube.com/watch?v=Jb5GKmEcJcw

And this glyph means "moon."  Notice the three dots in the middle?  I think their arrangement may have something to do with Orion's belt and the Orion Nebula, which was also possibly very important to the Mayans.

This was one of those lessons that prompted the kids to investigate on their own.  They checked out library books, and did internet searches to learn more, just because they wanted to!  They asked me questions as we passed each other in the hall.  They came up to me before and after school.  This was a hugely engaging topic!

So then the time came for us to create their glyphs.  I decided to use the Mayan syllabary chart to convert their names into syllabic symbols.  (Sort of like Japanese I guess)

This Pdf was a fantastic resource for me, and I read it, and was basically able to do the project from there.  http://www.famsi.org/research/pitts/MayaGlyphsBook1Sect1.pdf

We practiced breaking their names into syllables and writing their respective syllabic symbols.  That took another entire class.

The following class, I demonstrated how to combine their symbols into one glyph.  They then cut themselves a small piece of recycled cardboard, about 3x3 inches.  I didn't bother asking them to make perfect squares, and this turned out to make them look WAY better as a result.  I love the way they look displayed in a clump.

Anyhow, after cutting their cardboard, they traced the shape of it in their sketchbooks.  Using that shape, they drew their glyph in pencil, then cut out the sketch, which was then the exact size of their cardboard.

I cut a piece of gold tooling foil and wrapped the edges of it around their cardboard.  Then, they taped their paper pattern to the foil and traced it onto the gold foil.  The resulting impressions were pretty darn cool looking, but I wanted to make them look "ancient."

So the next class, i had them use a tiny tiny bit of black block printing ink (this was what I had on hand.  It's probably easier to use india ink if you have that.) and stippled it onto their foil just in the areas where they had indented lines.  Next, and this may sound weird but it worked GREAT, I gave them a blob of Germ-x squirted right onto their project.  Using their fingers, they smeared the ink into the grooves they'd drawn, then wiped away the excess with paper towels.  This was messy, but awesome.  :)  Some of them wanted to polish theirs a bit more, so we used Clorox wipes to do that.  Turns out the Clorox wipes removed a bit of the gold color on the foil too, and that made them look even more interesting in my opinion!  

I had them stick magnets to the back of the project before we inked them, but this is completely optional.  My intention was to display them by sticking them to this metal railing at my school, but they didn't stay very well, and I ended up duct-taping them to the wall instead.  Here's my finished example:


And here's how they looked on the railing:

And now clumped on the wall.  I used a twisted long piece of duct tape to stick them on and they have stayed up very well so far.  I like this look better, but if you've got a good spot to stick these with the magnets, that might look fabulous, too.  


Monday, August 13, 2012

Sketchbooks

So every year I try to refine and perfect things I messed up the year before.  Don't we all?  Last year, due to the sheer numbers of kids I had, some of them never actually got the lovely "art journal" packets I made.  New kids came and went, and every time a new kid showed up, I had to run off another packet.  Our copier is in use all the time, and I never seemed to be able to get in there to get that done.  So my solution is this:  Blank pages!  Yes, instead of art journals with tons of....ok let's face it...they were worksheets...My kids will have a sketchbook.  This is where I'll have them do thumbnail sketches, and when they are finished with the day's work they can choose a sketchbook prompt from the board, or from a list I'll print off.  I anticipated confusion, but when I said the word "sketchbook" today for the first time, there were plenty of positive responses from the kiddos. 

Let it be known, I am not a big fan at all of free draw in my class.  The kids tend to waste paper, and leave a mess, and even rush through the project so that they can draw whatever they want.  That's not ok.  They're supposed to be doing their best work all the time,  right?

I usually take the recycled paper from the workroom and let the kids use the blank side for free draw.  This is what
my free draw center looks like pretty much every day.  Tiki Man is angry.

So I just hole punched a pile of white copier paper and had each kid take 10 pages for now, and put them in the brad folders they were supposed to bring to class.  Today I only had time to give one class a sketchbook prompt.  Some of them sat and thought for a long time about it.  I told them it's ok to write in your sketchbook instead of draw.  It's for saving ideas.  So if they are pictures or words, it doesn't matter.  Studies have shown that working consistently in a sketchbook can help improve literacy.  Seriously.  That's what I read.  Somewhere.  I wish I could link you. 

Now I need a nice, organized way to store them.  I had been using colored file boxes, but they are really too small and tore up easily.  I need some rubbermaids, or maybe a shelf system.  If you use sketchbooks with elementary kids, what do you do?  Do you give prompts, or let them just draw and collage freely?  I'd really like to know.  This is something I hope I can be consistently utilizing rather than free draw or busywork.

Have a great start to the year!

Tuesday, October 11, 2011

Yoshimi Battle, Warhol Portraits, Oaxaca Animals, Keith Haring

Alright, the kiddos are finishing things now, and I am so excited about how this first round of big projects are turning out!  I had a deadline for my upcoming fundraiser, and the work all has to be finished by Wednesday of next week...this fundraiser is a blog entry in itself...more later.

5th Grade:
Yoshimi has battled the Pink Robots and her "ninja skillz" have paid off!  Objectives for this project included demonstrating knowledge of various types of balance, experimenting with lettering, figure proportions, and interpreting inspiration in a unique way.  Here are some of the finished works:


4th Grade:  I can't post a photo of the examples from the Warhol project here, since they include actual photos of the students.  But I'll do my best to describe what they did.  I took a photo of each kid standing in front of a white background.   Then I uploaded the pictures and bumped up the contrast and converted them all to black and white.  This project was all about CONTRAST!  I printed the photos out, two of the same picture on each page, and gave them to the kids.  They chose complementary colors from my treasure trove of Mr. Sketch markers.  (I recently acquired the 18 color packs which have tints of many of the colors.!  :D ) 

 They colored over their pictures, one in each complementary color.  Then they cut out their faces and bodies from the background, and glued them to another paper, which was already colored in the same complementary pair.  Finally, using darker values of the same two colors, they added Pop Art style lettering, and Ben Day Dots to the backgrounds.  So this was really more of a Lichtenstein/Warhol inspiration than just Warhol alone.  Anyhow they turned out pretty neat, and for a quick marker project, I was happy!  Lesson objectives included: analyzing color and contrast by choosing complements, and identifying and organizing colors by value. I figure you could also do this in primary colors, and teach a little about color mixing and Value...

3rd Grade:  Inspired by the Oaxaca Folk Art carvings of animals, we set out to compare organic and geometric shapes, and create patterns using shapes.    I had the kids find an image of an animal they liked, and draw it large on a white piece of paper.  Then, using thin-tipped markers (Mr. Sketch, of course!) they created patterns using EITHER organic OR geometric shapes.  I made sure I had them choose only one or the other, and stick to that theme, so that I could tell they could compare the shapes.  For this project I deliberately asked them not to draw any kind of background.  I think they are much more interesting without a fake "habitat" for the animals.


I've been impressed with this grade level so far.  I have one student who is so dedicated to finishing this project that she has come in EVERY DAY during recess the past week or so to work on it.  And we are having gorgeous weather.  I'm not talking about rainy days here.  This is the same group of kids I did Chihuly with last year, and they are just a super-creative group, with very sweet personalities and a lot of good character. 

2nd Grade:  The Keith Haring-Inspired line designs with movement are beautiful as I knew they would be.  Kids love Sharpies.  Heck, I LOVE SHARPIES.  When I told the kids we were going to have a fundraiser their response was, "So we can buy MORE SHARPIES!!?!?!?"  Yeah, baby.  So I posted the lesson for this Last Year, in September.  But this year I pushed the movement aspect of it more, and the kids seemed to understand the amount of lines I was asking for.   Objectives included: Creating pattern and movement using line, and being able to talk about Keith Haring.