After a kinda long and crazy year last year (there was surgery involved) I am back to being my spunky self and the first finished artwork of this school year is going up!
This year I am particularly pumped about a Mayan inspired project I've been doing with Third Grade. As you might know, I do a global continent theme with the kids, and Third Graders study Mexico, Central and South America. This summer, during a teacher workshop, we had lunch at Chipotle, and I saw their awesome Mayan glyphs in the restaurant. I thought, "I am in love with these, and I bet the kids would be, too!" So here's what I did:
First we had a whole class dedicated to talking about and exploring the culture of the Ancient Mayans. I showed this video: https://www.youtube.com/watch?v=og0cY1gGWG4
And we talked about Mayan numbers, and the calendar, and so forth. It was so fascinating to me and the kids that time went by super fast, and we had just enough time at the end of class for them to write Mayan numbers in their sketchbooks, and practice drawing a few simple glyphs for common Mayan words:

This one means "sun." Obviously the sun played a huge role in Mayan beliefs and culture. Their calendars are amazing! And no, they weren't wrong about the world "ending" on December 21, 2012. They didn't predict that at all; just the end of a very long cycle and the beginning of a new one. :)
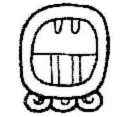
This one means "maize." The Mayan Creation Story is fascinating and explains why maize was so important to the Mayans. Check this video out. (May be a little gross for littles) https://www.youtube.com/watch?v=Jb5GKmEcJcw

And this glyph means "moon." Notice the three dots in the middle? I think their arrangement may have something to do with Orion's belt and the Orion Nebula, which was also possibly very important to the Mayans.
This was one of those lessons that prompted the kids to investigate on their own. They checked out library books, and did internet searches to learn more, just because they wanted to! They asked me questions as we passed each other in the hall. They came up to me before and after school. This was a hugely engaging topic!
So then the time came for us to create their glyphs. I decided to use the Mayan syllabary chart to convert their names into syllabic symbols. (Sort of like Japanese I guess)
This Pdf was a fantastic resource for me, and I read it, and was basically able to do the project from there. http://www.famsi.org/research/pitts/MayaGlyphsBook1Sect1.pdf
We practiced breaking their names into syllables and writing their respective syllabic symbols. That took another entire class.
The following class, I demonstrated how to combine their symbols into one glyph. They then cut themselves a small piece of recycled cardboard, about 3x3 inches. I didn't bother asking them to make perfect squares, and this turned out to make them look WAY better as a result. I love the way they look displayed in a clump.
Anyhow, after cutting their cardboard, they traced the shape of it in their sketchbooks. Using that shape, they drew their glyph in pencil, then cut out the sketch, which was then the exact size of their cardboard.
I cut a piece of gold tooling foil and wrapped the edges of it around their cardboard. Then, they taped their paper pattern to the foil and traced it onto the gold foil. The resulting impressions were pretty darn cool looking, but I wanted to make them look "ancient."
So the next class, i had them use a tiny tiny bit of black block printing ink (this was what I had on hand. It's probably easier to use india ink if you have that.) and stippled it onto their foil just in the areas where they had indented lines. Next, and this may sound weird but it worked GREAT, I gave them a blob of Germ-x squirted right onto their project. Using their fingers, they smeared the ink into the grooves they'd drawn, then wiped away the excess with paper towels. This was messy, but awesome. :) Some of them wanted to polish theirs a bit more, so we used Clorox wipes to do that. Turns out the Clorox wipes removed a bit of the gold color on the foil too, and that made them look even more interesting in my opinion!
I had them stick magnets to the back of the project before we inked them, but this is completely optional. My intention was to display them by sticking them to this metal railing at my school, but they didn't stay very well, and I ended up duct-taping them to the wall instead. Here's my finished example:

And here's how they looked on the railing:

And now clumped on the wall. I used a twisted long piece of duct tape to stick them on and they have stayed up very well so far. I like this look better, but if you've got a good spot to stick these with the magnets, that might look fabulous, too.


