Showing posts with label radial balance. Show all posts

Monday, January 30, 2012

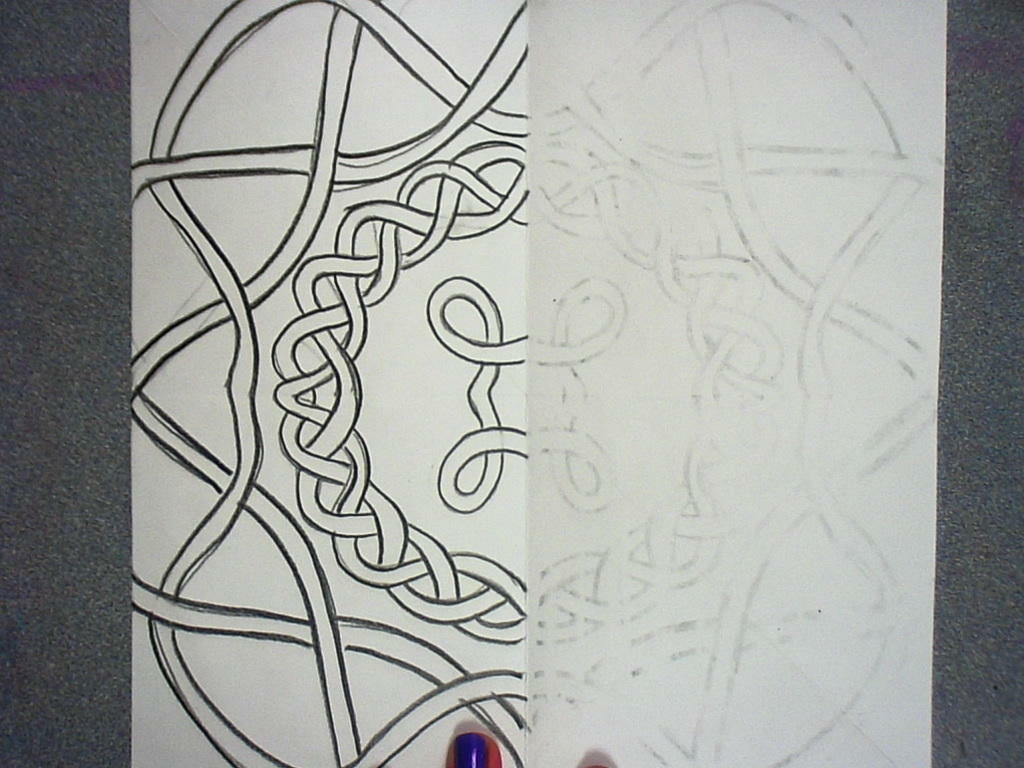
Finished Celtic Knots


After trying this with a few classes, I don't know why it never occurred to me to have them draw on colored paper, using the black and white charcoal.  I did that for my second example, (above) and it turned out much better.  But still, they are able to do the project with minimal whining.  I've found it's important to give them only the soft charcoal pencils and not the hard ones, since the hard ones obviously don't make as dark of a mark.


But here are a couple of the first few to be finished.  The later classes have drawn them on construction paper.  I found the construction paper, being more fibrous, I guess, took the charcoal better and added more contrast to the shaded parts.  But the white ones are very nice as well.  I found I really had to get the kids to think SIMPLE!  I coached them through drawing the center of the design, and then let them finish it however they liked.  A lot of them wanted to go nuts with overlapping knotwork, which did not translate well when they tried to transfer it into the other sections.


This one was just simple enough, and she did great with the shading.  So there ya go,  Fourth Graders CAN do Celtic knotwork!  :)

Friday, January 20, 2012

Frank Lloyd Wright- Inspired "Stained Glass"

I had been envious of the pretty chalk and glue line projects I've seen on other blogs, and it finally dawned on me that I could do that with black construction paper...

Second Graders have the North American Theme, and so I decided to tie this in with Frank Lloyd Wright, his geometric style and his stained glass.  We talked about geometric shapes vs. organic shapes, Balance, and Space.

I gave the kiddos a black piece of construction paper, about 6 x 9.  I told them to write their names on the back and then put their pencils away, because we were gonna draw with GLUE.  I found that it worked better to have them draw directly onto the paper with the glue, rather than try to make a design with the pencils first.  When they drew with the pencils, they made everything too small, and then trying to go over it with the glue was frustrating.  So, they made simple, geometric shapes, and made sure to leave some open space so they could "see" out of the window.

The following class I gave them chalk pastels to color in the spaces around the glue shapes.  I'd planned on giving them paintbrushes with tissue wrapped around the wrong end for blending, since I didn't have any Q-tips at the time.  One kid started using the actual brushy end of the brush to blend the colors, and it worked GREAT!  As long as they washed the brushes out afterwards, I let them use the paintbrushes for blending.  One less thing to buy!

Here's how they turned out.  There wasn't a single one that didn't look gorgeous!


Tuesday, December 13, 2011

Celtic Knot Unit

Today I was again shocked at how well my kiddos were concentrating as we drew Celtic Knots.  This must be one of those magic left brain drawings that lights up the whole kid's mind.  :)  Here are the steps for drawing another Celtic Knot unit.  Yes.  MY FOURTH GRADERS CAN DO THIS!!


Monday, December 12, 2011

Celtic Knots and Radial Balance

I wanted to spice up my Celtic Knot project that I've done several years in a row, because so far it just hasn't met my expectations.  Previously, I'd had the kiddos use their initials to make illuminated letters with Celtic imagery (which I'd photocopied from my Dover books and passed out in resource folders).  Most students just didn't really puzzle out how to draw the overlapping knots.  So I thought I'd make it easier by having them draw the knots with a Zentangle pattern.  Here are the steps for the pattern:


Original link here:  Tangle Patterns


So I showed them that step-by-step on the Elmo.  I expected a train wreck.  I told them this was an experiment, and I was going to see how they did before we even worried about turning this into a project or anything.  I expected tears, and crumpled papers flying across the room, hitting me in the head.  But, y'all....They did it!  They got the pattern in one or two tries.  Even the more challenged kids picked it up and were very satisfied to see that it worked for them!

Then I started showing them my work in progress.  I told them I was going to have them draw 1/4 of a Celtic knot, and "cheat" to make the pattern transfer onto the other parts of the paper.  I haven't tried this with the kiddos yet, so I'll keep you updated on how that goes.  This would work even better if you are willing to let the kiddos use charcoal pencils to outline their knots as they are transferring.

But here's what I did for my example:

 Fold the square paper in fourths and draw design in one corner.  Trace over it hard with an ebony pencil or other soft lead pencil.


 Fold and press with your hands, or a wooden spoon to transfer the pencil lines onto the second quarter of the paper.


 Open and you should see a very faint reverse image of the knot you drew.  Trace over it dark with the soft pencil. 


 Fold and transder the first half onto the second half.  (Good way to review factions, too!)


 Trace over the pencil lines darker. 


Connect the lines where they may be slightly mismatched, and begin coloring however you wish.

I think I'll make another fancier one as I go along, but I think the above example works well as an illustration.  Our state's standardized test has evidently got symmetry on it, and the kids aren't scoring so well with that.  In that case, I can actually help!  I've been stressing symmetry with all the grade levels this year.

Tuesday, October 11, 2011

Yoshimi Battle, Warhol Portraits, Oaxaca Animals, Keith Haring

Alright, the kiddos are finishing things now, and I am so excited about how this first round of big projects are turning out!  I had a deadline for my upcoming fundraiser, and the work all has to be finished by Wednesday of next week...this fundraiser is a blog entry in itself...more later.

5th Grade:
Yoshimi has battled the Pink Robots and her "ninja skillz" have paid off!  Objectives for this project included demonstrating knowledge of various types of balance, experimenting with lettering, figure proportions, and interpreting inspiration in a unique way.  Here are some of the finished works:


4th Grade:  I can't post a photo of the examples from the Warhol project here, since they include actual photos of the students.  But I'll do my best to describe what they did.  I took a photo of each kid standing in front of a white background.   Then I uploaded the pictures and bumped up the contrast and converted them all to black and white.  This project was all about CONTRAST!  I printed the photos out, two of the same picture on each page, and gave them to the kids.  They chose complementary colors from my treasure trove of Mr. Sketch markers.  (I recently acquired the 18 color packs which have tints of many of the colors.!  :D ) 
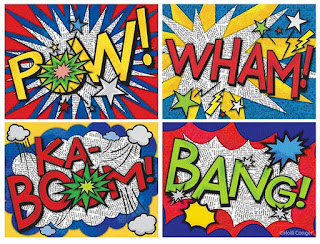
 They colored over their pictures, one in each complementary color.  Then they cut out their faces and bodies from the background, and glued them to another paper, which was already colored in the same complementary pair.  Finally, using darker values of the same two colors, they added Pop Art style lettering, and Ben Day Dots to the backgrounds.  So this was really more of a Lichtenstein/Warhol inspiration than just Warhol alone.  Anyhow they turned out pretty neat, and for a quick marker project, I was happy!  Lesson objectives included: analyzing color and contrast by choosing complements, and identifying and organizing colors by value. I figure you could also do this in primary colors, and teach a little about color mixing and Value...

3rd Grade:  Inspired by the Oaxaca Folk Art carvings of animals, we set out to compare organic and geometric shapes, and create patterns using shapes.    I had the kids find an image of an animal they liked, and draw it large on a white piece of paper.  Then, using thin-tipped markers (Mr. Sketch, of course!) they created patterns using EITHER organic OR geometric shapes.  I made sure I had them choose only one or the other, and stick to that theme, so that I could tell they could compare the shapes.  For this project I deliberately asked them not to draw any kind of background.  I think they are much more interesting without a fake "habitat" for the animals.


I've been impressed with this grade level so far.  I have one student who is so dedicated to finishing this project that she has come in EVERY DAY during recess the past week or so to work on it.  And we are having gorgeous weather.  I'm not talking about rainy days here.  This is the same group of kids I did Chihuly with last year, and they are just a super-creative group, with very sweet personalities and a lot of good character. 

2nd Grade:  The Keith Haring-Inspired line designs with movement are beautiful as I knew they would be.  Kids love Sharpies.  Heck, I LOVE SHARPIES.  When I told the kids we were going to have a fundraiser their response was, "So we can buy MORE SHARPIES!!?!?!?"  Yeah, baby.  So I posted the lesson for this Last Year, in September.  But this year I pushed the movement aspect of it more, and the kids seemed to understand the amount of lines I was asking for.   Objectives included: Creating pattern and movement using line, and being able to talk about Keith Haring.


Friday, September 30, 2011

Yoshimi Battles the Pink Robots

This year with 5th grade, I've tried what I consider to be a bold, outside-the-box project.  Prompted by a student's request that we do a project related to manga, and our Asian art theme, and the new Mr. Sketch markers, I thought about how I could tie all that together. 

Years ago when I was teaching K-8 at a small Catholic school, I tried this on the first day of my Art Appreciation class with the middle schoolers.  I turned on the Flaming Lips' Yoshimi Battles the Pink Robots, Parts 1 and 2 and asked them to sketch whatever images came to mind as they listened to the music.  They thought I was from another planet.  They were used to nuns and opera music in the art room.  Robots were unheard of.  But their images were interesting.  I think they were held back mostly by the fact that they were middle school kids, and thus more concerned with looking cool than with being creative. 

This year's 5th graders are diving into this project with uncanny enthusiasm.  Maybe it's because I told them a fellow student gave me this idea, or maybe it's the musical element, or the smelly markers.  The objectives for this lesson included drawing body proportions of the girl Yoshimi, face proportions, choosing a type of balance to use (i.e. radial or asymmetrical) and experimenting with comic style lettering.  So far they are enjoying it.  I'll have to post some examples when they finish.

At least for now, they are all singing, "Oh Yoshimi, they don't believe me, but you won't let those robots eat me..."

Tuesday, February 1, 2011

Artist's Trading Cards


I've noticed that students really love these mini-art projects and I think they're a great way to reinforce vocabulary words that we learn along with each project, especially Elements and Principles. I had previously kept a folder in my classroom with info for students to make these on their own, but they weren't working on those with the level of quality I wanted to see. So I think as a follow-up to all my big lessons, I'll have the students (at least 3rd grade and up) create a trading card for the Element or Principle we focused on for the project. I also found this worked well for my classes who have missed out on the big projects because of snow days or other scheduling hiccups. Instead of having them create the whole project on Radial Balance, I just had them work for one class period on an ATC. They were really into it once we got started and they loved digging through my "junk box" to find treasures for use in their cards. I required that the whole background of the card be covered first to avoid looking unfinished, and I also required that they encorporate the vocabulary word in their design, using cut collaged letters (ransom-note style.)


Here is my example for radial balance:


It would also be fun to try this with representations for different artists, and have students make a card in the style of Kandinsky or Van Gogh. This would work best with older students. I've only tried that with 5th graders so far. But I think as a summative assesment tool these could be very effective, not to mention fun! My kiddos love the idea of making them for other people, and I've always wanted to start a trading group with another school. Dream Big. :D