Showing posts with label art on a cart. Show all posts

Friday, September 25, 2015

Hey I'm Back! And Obsessing over the Mayans...

Greetings!

After a kinda long and crazy year last year (there was surgery involved) I am back to being my spunky self and the first finished artwork of this school year is going up!

This year I am particularly pumped about a Mayan inspired project I've been doing with Third Grade.  As you might know, I do a global continent theme with the kids, and Third Graders study Mexico, Central and South America.  This summer, during a teacher workshop, we had lunch at Chipotle, and I saw their awesome Mayan glyphs in the restaurant.  I thought, "I am in love with these, and I bet the kids would be, too!"  So here's what I did:

First we had a whole class dedicated to talking about and exploring the culture of the Ancient Mayans.  I showed this video: https://www.youtube.com/watch?v=og0cY1gGWG4

And we talked about Mayan numbers, and the calendar, and so forth.  It was so fascinating to me and the kids that time went by super fast, and we had just enough time at the end of class for them to write Mayan numbers in their sketchbooks, and practice drawing a few simple glyphs for common Mayan words:
This one means "sun."  Obviously the sun played a huge role in Mayan beliefs and culture.  Their calendars are amazing!  And no, they weren't wrong about the world "ending" on December 21, 2012.  They didn't predict that at all; just the end of a very long cycle and the beginning of a new one.  :)
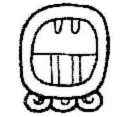
This one means "maize."  The Mayan Creation Story is fascinating and explains why maize was so important to the Mayans.  Check this video out.  (May be a little gross for littles) https://www.youtube.com/watch?v=Jb5GKmEcJcw

And this glyph means "moon."  Notice the three dots in the middle?  I think their arrangement may have something to do with Orion's belt and the Orion Nebula, which was also possibly very important to the Mayans.

This was one of those lessons that prompted the kids to investigate on their own.  They checked out library books, and did internet searches to learn more, just because they wanted to!  They asked me questions as we passed each other in the hall.  They came up to me before and after school.  This was a hugely engaging topic!

So then the time came for us to create their glyphs.  I decided to use the Mayan syllabary chart to convert their names into syllabic symbols.  (Sort of like Japanese I guess)

This Pdf was a fantastic resource for me, and I read it, and was basically able to do the project from there.  http://www.famsi.org/research/pitts/MayaGlyphsBook1Sect1.pdf

We practiced breaking their names into syllables and writing their respective syllabic symbols.  That took another entire class.

The following class, I demonstrated how to combine their symbols into one glyph.  They then cut themselves a small piece of recycled cardboard, about 3x3 inches.  I didn't bother asking them to make perfect squares, and this turned out to make them look WAY better as a result.  I love the way they look displayed in a clump.

Anyhow, after cutting their cardboard, they traced the shape of it in their sketchbooks.  Using that shape, they drew their glyph in pencil, then cut out the sketch, which was then the exact size of their cardboard.

I cut a piece of gold tooling foil and wrapped the edges of it around their cardboard.  Then, they taped their paper pattern to the foil and traced it onto the gold foil.  The resulting impressions were pretty darn cool looking, but I wanted to make them look "ancient."

So the next class, i had them use a tiny tiny bit of black block printing ink (this was what I had on hand.  It's probably easier to use india ink if you have that.) and stippled it onto their foil just in the areas where they had indented lines.  Next, and this may sound weird but it worked GREAT, I gave them a blob of Germ-x squirted right onto their project.  Using their fingers, they smeared the ink into the grooves they'd drawn, then wiped away the excess with paper towels.  This was messy, but awesome.  :)  Some of them wanted to polish theirs a bit more, so we used Clorox wipes to do that.  Turns out the Clorox wipes removed a bit of the gold color on the foil too, and that made them look even more interesting in my opinion!  

I had them stick magnets to the back of the project before we inked them, but this is completely optional.  My intention was to display them by sticking them to this metal railing at my school, but they didn't stay very well, and I ended up duct-taping them to the wall instead.  Here's my finished example:


And here's how they looked on the railing:

And now clumped on the wall.  I used a twisted long piece of duct tape to stick them on and they have stayed up very well so far.  I like this look better, but if you've got a good spot to stick these with the magnets, that might look fabulous, too.  


Saturday, August 9, 2014

Happy August, Everybody!

School's already started back?  WHAAAT!?  Seems like it's earlier every year.  Anyway, here's a little update on me.  

Our school is pretty severely overcrowded at this point, and I'm still in a mobile Art situation.  At the end of the year last year, I was asked if I would prefer to move to the former concession stand near the gym and the music room, and I jumped at the chance.  My previous office was small and had carpet.  This one is twice the size, has linoleum flooring, lots of countertops and cabinets, and best of all, a sink!  So it's much more conducive to arty-ness, even though it's still not the same as having an actual classroom.  This location is pretty ideal for me, being near the gym and the stage for theatre things, and near the music room for collaborating with my Fine Arts buddies.


There are moments when I still feel overwhelmed, but I do feel like I'm better equipped this year to make the program work.  And yes, that is the TARDIS on my office door.  At first, I did that for me, just to add a little personality to the space, but then I decided to make it relevant and cuter by adding "Imagination makes you bigger on the inside," above the door.  Already had some compliments on that!


This year we are on an 8 day color rotation.  And since the specials teachers almost all have an additional part time teacher, that makes the planning piece very complicated.  It's going to be pretty near impossible to coordinate on a lesson that keeps pace and is consistent across a grade level.  So my co-teacher and I have decided to have her teach her own self contained lessons, focusing primarily on art criticism, since that's what I tend to leave out due to time constraints.  I will let you all know how that turns out!

But for now, HAPPY SCHOOL YEAR!


Thursday, March 27, 2014

Trial and Error

So I've been adapting most of my lessons to the mobile art program pretty well.  But there are definitely some things that have to be changed completely.  Anything that I would normally put on a drying rack now has to go out in the hallway against the wall to dry.  The littles are used to doing this, since they make a lot of projects in their academic curriculum that need drying.  But the big kids?  It was weird to them, and so part of me just wants to nix all that with the big kids.  Their work got stepped on a bit, since they are more rowdy and have bigger feet, I guess?

I was trying out a faux batik lesson with first grade, and the process was to "draw" on muslin fabric with white glue, then let it dry.  Next day, paint over the entire piece of fabric with bold colored tempera paint.  Since I'm on a cart, I gave everyone blue paint.  I couldn't deal with multiple colors of tempera in a room with barely any space to walk between tables, and ONE sink.

The other teachers have been very receptive and accommodating for the most part.  My school is awesome, and my colleagues are the best.  Seriously.  One teacher said I could just leave the wet projects at the kids' seats, since they are my last class of the day and that way, each kid would know which one was theirs without having to mess with writing names on fabric.  I hope I didn't stain her tables blue with paint.  

I have assigned helper kids to collect work at the end of the day once it's dried, and put it back in their portfolio box, but I really don't know if that's happening or not.

The hardest thing for me is when I've made my example, and it worked fine for me, but then when I get in the room, something malfunctions and I have to switch gears on the spot.  I can't leave the room, and I can't send a kid to fetch something, since my stuff is all spread out in various places and I don't even know where everything is offhand.  Most often, I run out of paper, or there's a new kid in class who doesn't have a sketchbook yet, and I have no way to make him one right there.

Another thing I'm struggling with is figuring out a way to have "I CAN" statements posted for my lessons.  I can put them in the powerpoint when I introduce a project, and I can reiterate them while I'm teaching, but the only other thing I can think of is having the kids copy them in their sketchbooks.  That takes a lot of time though, and when I'm already losing minutes setting up, traveling to the classes, and cleaning up, I'm not sure I'm willing to take 20 minutes for a whole class to copy a bunch of objectives.  I could also have them posted on a white board that is attached to my main cart somehow, but it would have to be HUGE to fit everything.  Maybe a flipchart or something?  But again, more stuff to take with me everywhere...

I also get a little frustrated when kids explain to me, "Oh, everybody will be quiet if you just ring the bell," or whatever their classroom "thing" is.  I cannot remember 35 different things for 35 different classrooms. Oi vey.

Also, if I take my laptop with me to the classrooms, so that I can access all my files faster, I inevitably have to reboot entirely so that I can connect to the network in that room.  But that's just a technology glitch. 

So every day is different.  I keep a binder with me that has my lesson plans, class lists, and schedule.  And on each grade level cart, I put the project example.  Yes, I trust the kids not to touch it when it's out in their hallway.  Maybe I shouldn't, but so far, so good!  Ha!  Sometimes I can't even get the cart into the room.  There are so many desks and obstacles in each room and the layouts are completely different, sometimes from week to week!  Our teachers, being so fabulous, like to change up their seating arrangements frequently, which is good for the kiddos but not for me.

I hope that by sharing my experience I can help somebody out who's going through this transition!  I would love to hear about your own situations, too.  Maybe we can put our heads together to solve some of these challenges!


Tuesday, March 25, 2014

Here Comes the Art Mobile!

Hey there.  Sorry I haven't made a post in like - forever!  Been kinda busy.  This January our school's overcrowding got out of control and I have been (temporarily - probably) placed on a cart.  My classroom is now full of kindergarteners.

I have learned a lot so far about what works and what doesn't.
(Pictured:  Unit 00.  This is the cart which I take to every room, sometimes I park it outside the class, or inside, depending on how much space there is in the room.  I didn't clean it up or organize it for the picture.  I wanted to be real with you guys.  It's got my water bottle, project examples, my time timer, drawing books for sketchbook time, glue sticks, markers, scissors, and a lot of nasty pencil shavings which I can't seem to control no matter what I do.)


The first thing I asked for was to have a separate cart for each grade level, and another main cart with basic supplies everybody can share, as well as my planning stuff.  That works pretty well, except when I fail to think about the fact that I need that box of pastels for second grade in the afternoon and fifth grade has it in the morning and I have zero minutes in between classes to go and get it.

(Pictured:  Art Mobiles on their hallway, my paper storage drawers, and the blue class portfolio bins)


Thus, I employ children.  That's right.  Child labor!  No.  Just kidding.  But I do give a lot of "helper" jobs to each class.  I have four helpers whose job it is to push into and out of the rooms, and on to their next destination.  Sometimes they get to push the button on the elevator.  This is a big deal.  Then in addition to that, I have two or three helpers to get the class portfolio box, which I keep on the hallway as well.

So all that's going ok.  I was disappointed that I couldn't do clay with the kiddos this year, but fourth grade has made some cool paper sculptures of Classical columns, all working in their groups at their own desks in their fourth grade classroom.

So other than all that, it's going.  If you are teaching from a cart, please share with me what you've learned so far!  Hopefully by the time I get used to it, I will be in a classroom again, but still!  :)