Today I was again shocked at how well my kiddos were concentrating as we drew Celtic Knots. This must be one of those magic left brain drawings that lights up the whole kid's mind. :) Here are the steps for drawing another Celtic Knot unit. Yes. MY FOURTH GRADERS CAN DO THIS!!
Tuesday, December 13, 2011
Monday, December 12, 2011
NEWS FLASH! Acrylic Paint +Crayola Glue = Block Printing Ink
I have been frustrated with the cost of block printing ink, and the way that it seems to get wasted whenever I use it with my students. So I tried making my own. I was shocked that it actually worked. :)
Using CRAYOLA school glue (not the runny Elmer's kind) and regular old cheap-y acrylic paint, I mixed an almost 1:1 ratio. I put a little bit more paint than glue. Then I used the roller to mix it all. I suppose you could do this ahead of time and keep it in air-tight jars. maybe the glue would settle to the bottom of the jar though. I don't know. Anyhow, the thickness of the glue made the paint less runny, and it also added a bit of tackyness to the ink, so that it had that orange peel texture as I rolled it on the plate. Only problem I noticed was that it dries faster than block printing ink. Maybe that's not a problem to you, but I'm very fastidious about my prints, and I clean as I go, so I work slowly.
Anyhow, it worked! I thought this was worth sharing with all 88 of you ;)
Using CRAYOLA school glue (not the runny Elmer's kind) and regular old cheap-y acrylic paint, I mixed an almost 1:1 ratio. I put a little bit more paint than glue. Then I used the roller to mix it all. I suppose you could do this ahead of time and keep it in air-tight jars. maybe the glue would settle to the bottom of the jar though. I don't know. Anyhow, the thickness of the glue made the paint less runny, and it also added a bit of tackyness to the ink, so that it had that orange peel texture as I rolled it on the plate. Only problem I noticed was that it dries faster than block printing ink. Maybe that's not a problem to you, but I'm very fastidious about my prints, and I clean as I go, so I work slowly.
Anyhow, it worked! I thought this was worth sharing with all 88 of you ;)
Celtic Knots and Radial Balance
I wanted to spice up my Celtic Knot project that I've done several years in a row, because so far it just hasn't met my expectations. Previously, I'd had the kiddos use their initials to make illuminated letters with Celtic imagery (which I'd photocopied from my Dover books and passed out in resource folders). Most students just didn't really puzzle out how to draw the overlapping knots. So I thought I'd make it easier by having them draw the knots with a Zentangle pattern. Here are the steps for the pattern:
Original link here: Tangle Patterns
So I showed them that step-by-step on the Elmo. I expected a train wreck. I told them this was an experiment, and I was going to see how they did before we even worried about turning this into a project or anything. I expected tears, and crumpled papers flying across the room, hitting me in the head. But, y'all....They did it! They got the pattern in one or two tries. Even the more challenged kids picked it up and were very satisfied to see that it worked for them!
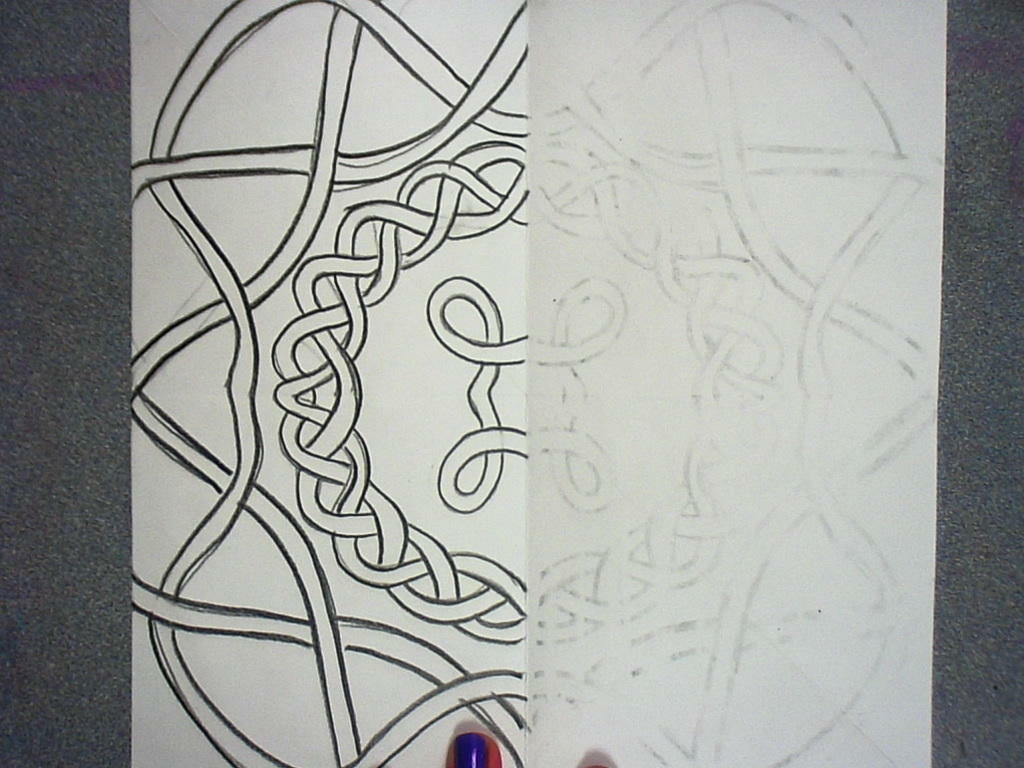
Then I started showing them my work in progress. I told them I was going to have them draw 1/4 of a Celtic knot, and "cheat" to make the pattern transfer onto the other parts of the paper. I haven't tried this with the kiddos yet, so I'll keep you updated on how that goes. This would work even better if you are willing to let the kiddos use charcoal pencils to outline their knots as they are transferring.
But here's what I did for my example:
Fold the square paper in fourths and draw design in one corner. Trace over it hard with an ebony pencil or other soft lead pencil.
Fold and press with your hands, or a wooden spoon to transfer the pencil lines onto the second quarter of the paper.
Open and you should see a very faint reverse image of the knot you drew. Trace over it dark with the soft pencil.
Fold and transder the first half onto the second half. (Good way to review factions, too!)
Trace over the pencil lines darker.
Connect the lines where they may be slightly mismatched, and begin coloring however you wish.
I think I'll make another fancier one as I go along, but I think the above example works well as an illustration. Our state's standardized test has evidently got symmetry on it, and the kids aren't scoring so well with that. In that case, I can actually help! I've been stressing symmetry with all the grade levels this year.
Original link here: Tangle Patterns
So I showed them that step-by-step on the Elmo. I expected a train wreck. I told them this was an experiment, and I was going to see how they did before we even worried about turning this into a project or anything. I expected tears, and crumpled papers flying across the room, hitting me in the head. But, y'all....They did it! They got the pattern in one or two tries. Even the more challenged kids picked it up and were very satisfied to see that it worked for them!
Then I started showing them my work in progress. I told them I was going to have them draw 1/4 of a Celtic knot, and "cheat" to make the pattern transfer onto the other parts of the paper. I haven't tried this with the kiddos yet, so I'll keep you updated on how that goes. This would work even better if you are willing to let the kiddos use charcoal pencils to outline their knots as they are transferring.
But here's what I did for my example:
Fold the square paper in fourths and draw design in one corner. Trace over it hard with an ebony pencil or other soft lead pencil.
Fold and press with your hands, or a wooden spoon to transfer the pencil lines onto the second quarter of the paper.
Open and you should see a very faint reverse image of the knot you drew. Trace over it dark with the soft pencil.
Fold and transder the first half onto the second half. (Good way to review factions, too!)
Trace over the pencil lines darker.
Connect the lines where they may be slightly mismatched, and begin coloring however you wish.
I think I'll make another fancier one as I go along, but I think the above example works well as an illustration. Our state's standardized test has evidently got symmetry on it, and the kids aren't scoring so well with that. In that case, I can actually help! I've been stressing symmetry with all the grade levels this year.
Thursday, December 8, 2011
Finished Thiebaud Cupcakes
These turned out really cute!
I ended up just mixing the "frosting" paint in a ziploc bag, about 2 bottles of Elmer's glue to half a can of shaving cream. I cut the corner of the baggie off and squeezed the frosting on the cupcakes myself. The Kindergarteners were not able to use the small squeeze bottles efficiently, and ended up with not enough frosting, or way too much. Thus, I let them add more details, like the crinkles on the cupcake wrappers and the sprinkles and cherry.
The frosting paint took TWO FULL DAYS to dry. Beware of taking them off the drying rack and storing them when the frosting is dry-ish, even dry to the touch, it can still squish out from underneath and get them hopelessly stuck together.
UPDATE: I've since made this project even better by mixing in one more element: JELLO. See my blog on Chocolate Paint. After I tried it that way, I noticed the paint drying very hard, but it still had texture. I wanted the texture to be fluffy though! So I mixed about a half a box of JELLO pudding powder into a half a gallon ziploc baggie with a fourth a can of shaving cream and a half a bottle of glue. I made two batches; one chocolate and one vanilla. Below are the results of this experiment:
The finished project
Shaving cream "paint" still wet
I ended up just mixing the "frosting" paint in a ziploc bag, about 2 bottles of Elmer's glue to half a can of shaving cream. I cut the corner of the baggie off and squeezed the frosting on the cupcakes myself. The Kindergarteners were not able to use the small squeeze bottles efficiently, and ended up with not enough frosting, or way too much. Thus, I let them add more details, like the crinkles on the cupcake wrappers and the sprinkles and cherry.
The frosting paint took TWO FULL DAYS to dry. Beware of taking them off the drying rack and storing them when the frosting is dry-ish, even dry to the touch, it can still squish out from underneath and get them hopelessly stuck together.
UPDATE: I've since made this project even better by mixing in one more element: JELLO. See my blog on Chocolate Paint. After I tried it that way, I noticed the paint drying very hard, but it still had texture. I wanted the texture to be fluffy though! So I mixed about a half a box of JELLO pudding powder into a half a gallon ziploc baggie with a fourth a can of shaving cream and a half a bottle of glue. I made two batches; one chocolate and one vanilla. Below are the results of this experiment:
See how fluffy they are! They have to be staggered on the drying rack, because they even rise a little bit as they dry. Some students decided to make ice cream cones instead of cupcakes. I like that idea, too.
The finished product! If you look closely you can see a little indentation on the left side where the drying rack smushed the icing a bit as it dried.
So far I like the Jello/Shaving cream/glue paint the best. But for different applications, I can see how the other types could be very useful too!
Friday, November 11, 2011
Wayne Thiebaud Inspired Cupcakes with Texture! (And the Joy of Pinterest)
At another table, I set up my "epic sparkle paint" or "lumpy paint" as I called it in one class. I just literally poured all the remnants of various specialty paints I had into a cool whip container and mixed it all up. I had mostly gold tempera, with various colors of glitter glue and loose glitter, and some "texture-it" paint.
The kids painted another half sheet of drawing paper with the gold sparkle paint. I ALMOST let them use their hands for this, but with 28 kindergarteners in a class at a time, I couldn't deal with it all. if you have a smaller class, or you want to do each step one day at a time, then it might work to let them use their hands. I've done that with first grade before, and it was a lovely mess. :)
At the third table I set up texture rubbing plates, crayons without paper, and free draw scrap paper. This was a great filler activity, because it related to what we were making, but they could take it with them, instead of having to let it dry.
On day two, after talking about the fabulous Wayne Thiebaud and his deliciously textured paintings, the kiddos will be given trapezoid-shaped stencils to trace onto their gold paper and cut out. Those will be glued onto the tissue paper background with glue sticks.
Finally, the PUFFY PAINT!! This was so easy I almost choked with joy. :) In a ziploc bag, I squirt equal parts Elmer's glue and cheap Shaving cream. I smush it all up. Thenm I empty the air out of the bag and reseal it. I cut the corner of the bag off and squeezed it out just like icing! You may have to make a fresh batch for each class, so don't make too much at once! I am trying to get some red pom poms or buttons to add to the top of our cupcakes as little cherries. I've also seen people use colored rice for sprinkles.
I like this puffy paint better than other texture paints, which I've made with sawdust and joint compound in the past. This was just so fun to squeeze and it even smells nice!
I am a little worried I might have some kiddos try to eat their cupcakes. Haha! And you know what, while this project is ever so slightly cutesy, I like that it can be so closely tied to the Element of Texture and the artist Thiebaud. It's almost over the top for me, but the puffy paint made it way fun. Above is my Gigi's style cupcake, with 90% icing. :)
I am going to experiment with another texture paint recipe I found on Pinterest. This one uses flour, salt, and tempera paint. They put it in condiment bottles, and that may be easier to mix up than the shaving cream.
By the way, if you are an Art Educator, a teacher, or a parent, you MUST check out Pinterest. It's a bulletin board system for pictures and links. I can't say enough wonderful things about it. Since I made my boards I have tried countless recipes, activities, and even put together outfits, and teaching ideas just because of other people's brilliance. Lost of hits for my blog there too! Here's a link to my pinterest page, feel free to follow me!
Saturday, October 29, 2011
Artome: Best Fundraiser EVER.
This year, per suggestion by my principal, I tried a different art fundraiser. In the past I've used OriginalWorks, and wasn't at all happy with it. It was so much work for me to trim the pieces (they all had to be 8 x 10.5 or somesuch, a non-standard size) because invariably I'd run out of the paper they sent, or need to use a different piece of paper for the project, or I'd want to do a square or circle project that didn't fit the format... It was also a pain to collect orders myself and handle all of the logistics.
Artome was infinitely better, because it turned the fundraiser into an event. The kids were able to attend an art show in the evening with their parents, and see every child's work displayed in a beautiful frame with a double mat. The company charges $18 per frame, and I elected to charge $25 on my end so that we made a pretty significant amount from each sale. (More than yearbook!) Parents are able to order the framed work, and even reproductions of the pieces for gifts, even if they cannot attend the show.
The best part of all was that Artome came to my school and set the whole thing up, took it apart, and handled the reproduction orders, and last minute frame jobs onsite. I had many parents telling me they loved this idea, and that they definitely wanted me to do it again next year.
For once, everybody is happy!
Artome was infinitely better, because it turned the fundraiser into an event. The kids were able to attend an art show in the evening with their parents, and see every child's work displayed in a beautiful frame with a double mat. The company charges $18 per frame, and I elected to charge $25 on my end so that we made a pretty significant amount from each sale. (More than yearbook!) Parents are able to order the framed work, and even reproductions of the pieces for gifts, even if they cannot attend the show.
The best part of all was that Artome came to my school and set the whole thing up, took it apart, and handled the reproduction orders, and last minute frame jobs onsite. I had many parents telling me they loved this idea, and that they definitely wanted me to do it again next year.
For once, everybody is happy!
Subscribe to:
Posts (Atom)